Filmmakers rejoice
Smartphones are becoming impressively sophisticated through the addition of new features found in DSLRs and cinema cameras. Things once exclusive to professional filmmakers are becoming more accessible to the masses. The most exciting addition to the arsenal of filmmaking prowess in newer phones is the ability to shoot in Apple ProRes Log.
 For filmmakers, it’s considered as a flat, picture profile that is less processed with more dynamic range. For everyday people, before you dissociate and move on to the next blog, we will simplify what that means.
What is Apple ProRes Log?
What is Apple ProRes? What is Log? The former is not a professional apple, and the latter is not a mutilated tree.
Apple ProRes is a video codec that simultaneously retains impressive image quality while processing smoothly in your editing workflow. Files like Apple ProRes have minimal compression and are thus easier on computers during editing.
Log is a video format that gives filmmakers an image packed with more dynamic range. This translates to much more detail in the shadows and highlights compared to conventional video. Log maximizes the information captured by the camera, spreading the love equally between shadows, mid-tones, and highlights, rather than just the mid-tones. Also, there is much more color information in your image for flexibility with color grading to create a stylistic look. Without that dynamic range, tweaking colors and exposure can create unwanted, artificial artifacts and digital noise in your image.
Is it for me?
Now, Apple ProRes Log is offered on new iPhones (check out which ones here). Just like in cinema and DSLR cameras, Log footage comes out flat and desaturated. It takes work to restore the color and exposure that you want. That may be a game changer, as putting in that extra work isn’t for everyone.
Before we get into the weeds of technicalities, check out this video that shows the before and after of Log footage that was then color-graded. A little incentive, if you will.
The ooo’s and aaa’s of Log footage
Now, why would Log footage be something desirable? As we’ve said before, the ability to stylize a video and make it look cinematic can be appealing to many creators. Secondly, as described by vlogger Zy Cheng, the feature provides users an “unprecedented way to get a faithfully organic image out of our iPhones.” That’s because in Apple ProRes Log, there’s no local tone mapping.
Oh boy, yes, another technical term. Local tone mapping occurs when your phone selectively darkens or lightens certain parts of your image automatically. That’s because we often encounter scenes with a lot of contrast. Think of mountains silhouetted against candy-pink skies or a dramatically lit interview. If you point your phone at it, there’s an automatic process that occurs that may or may not give you the look that you’re going for.
Tone mapping works wonderfully for most scenarios. But, what if you are going for a contrasty-looking image? In Apple ProRes Log, this automation is “yeeted” (millennial cringe), or disabled, giving the filmmaker complete freedom to create the look and feel they want.
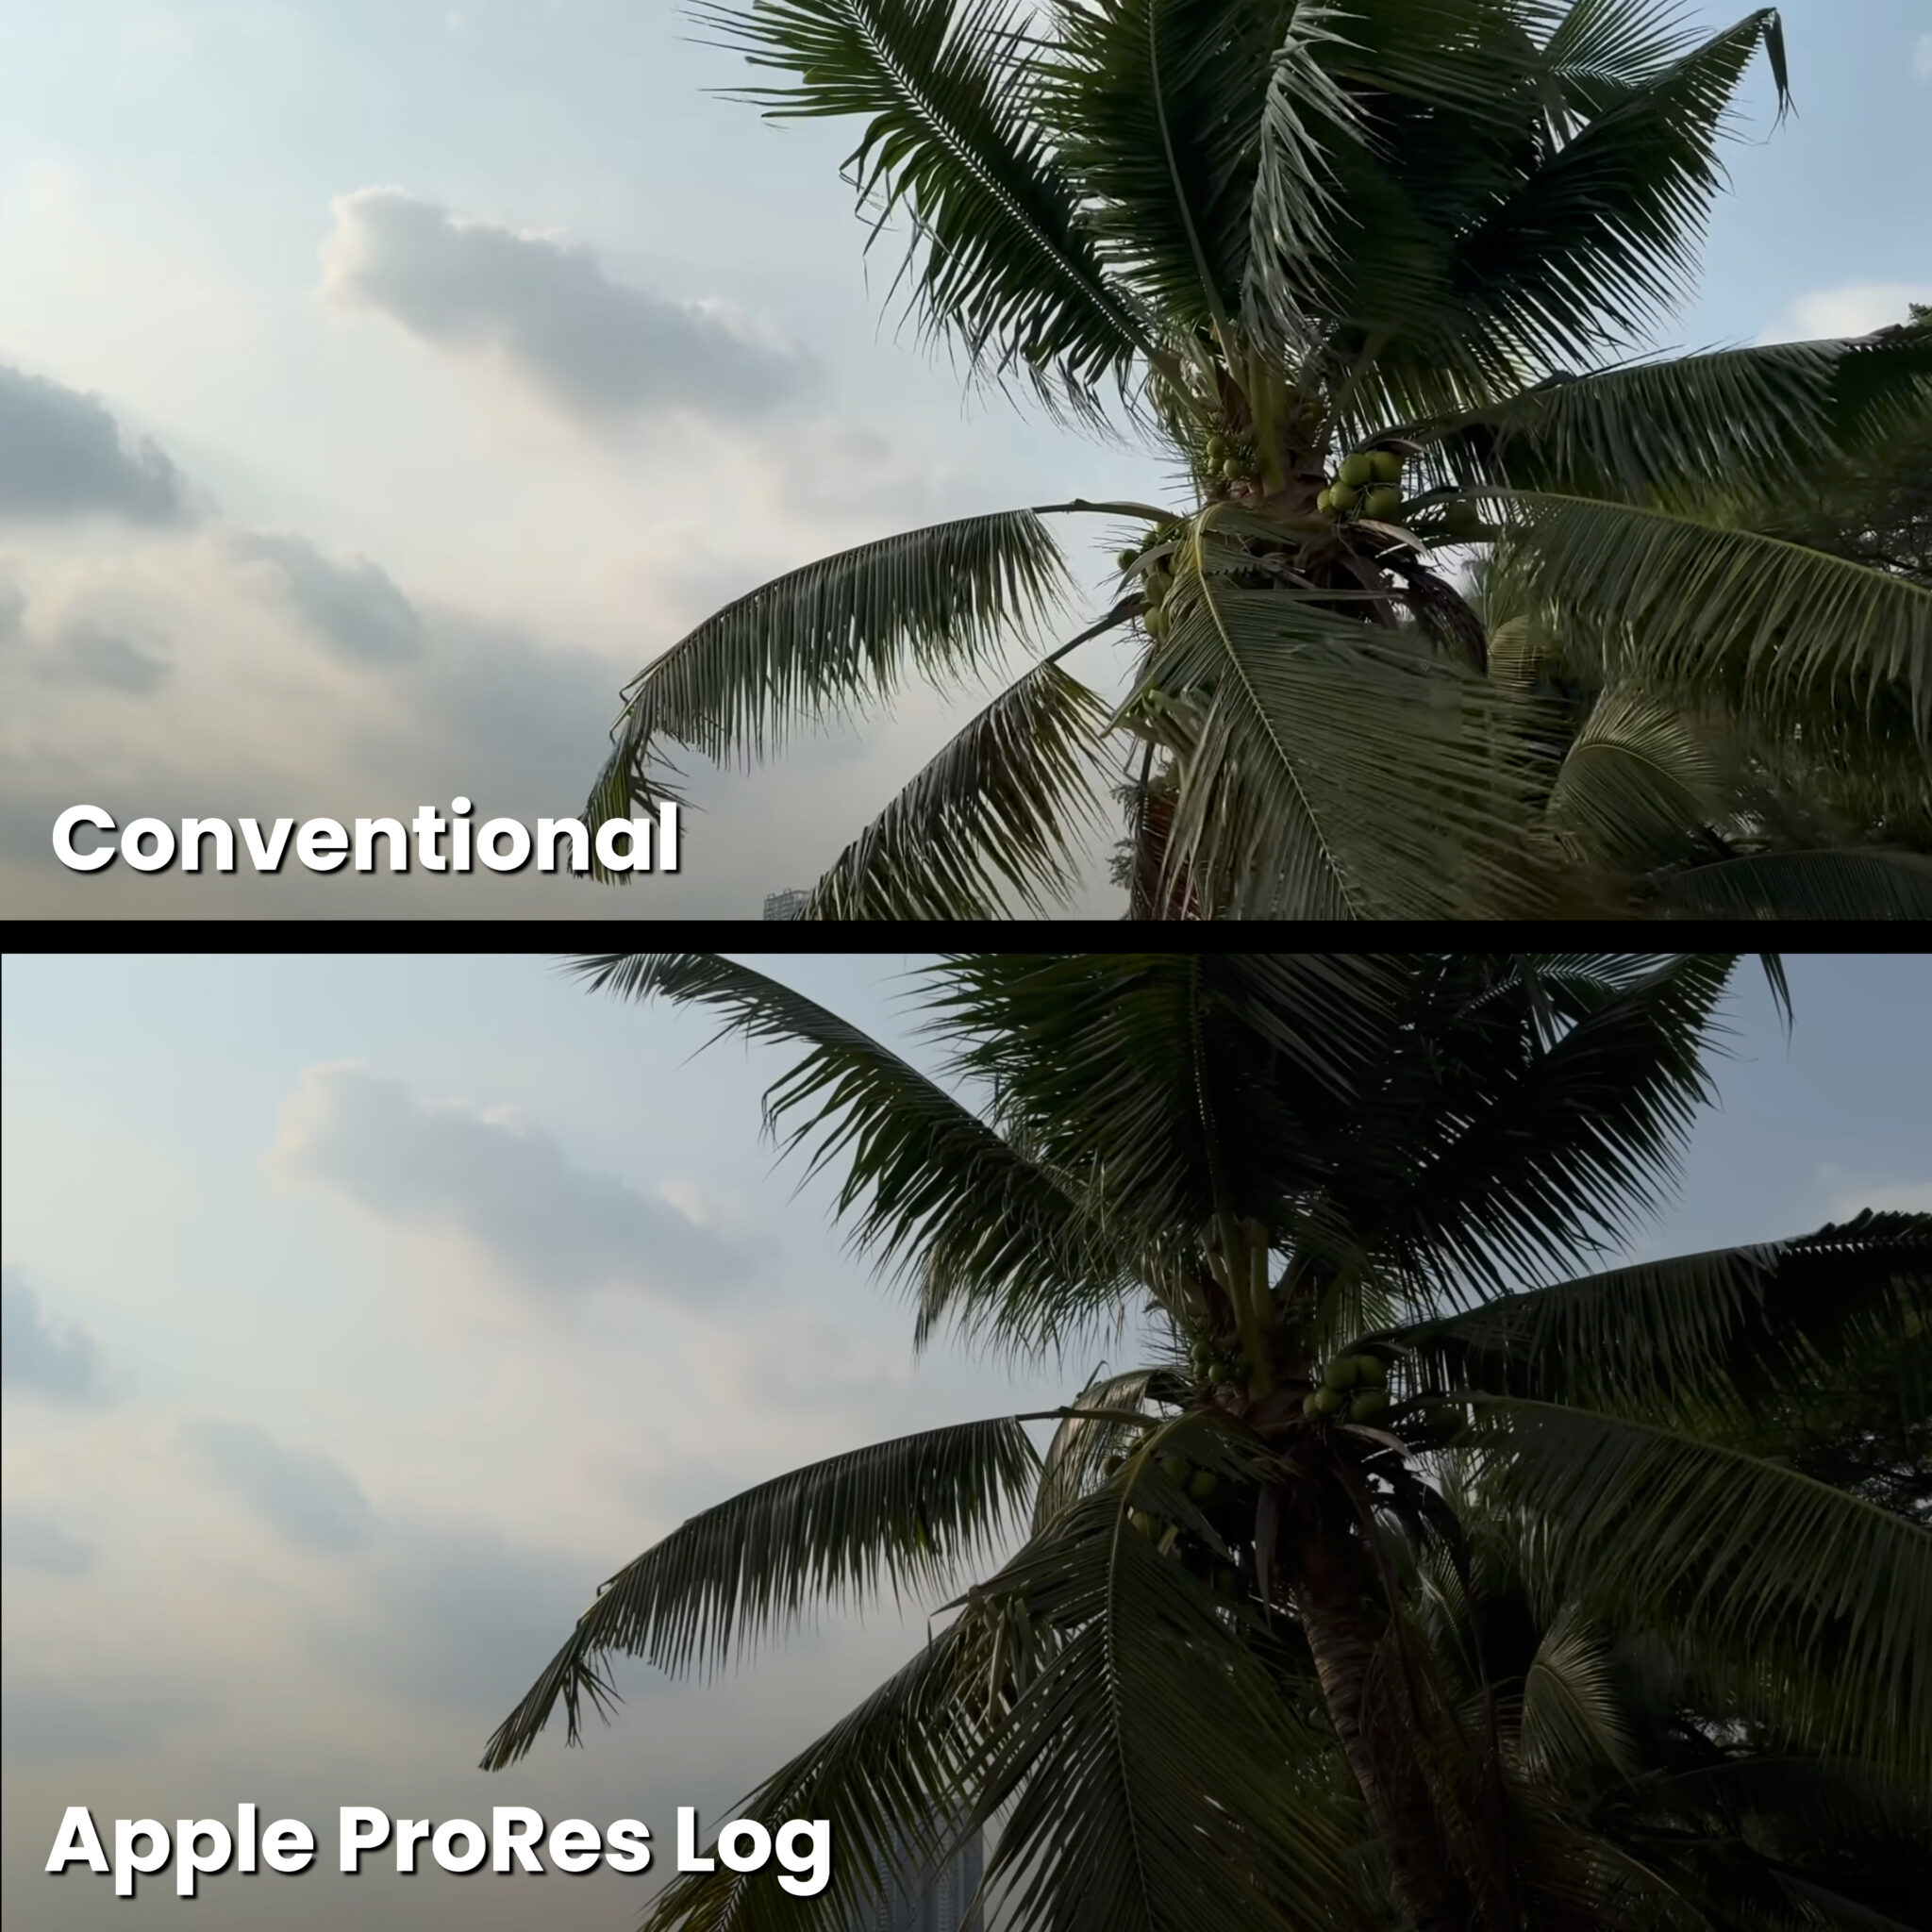
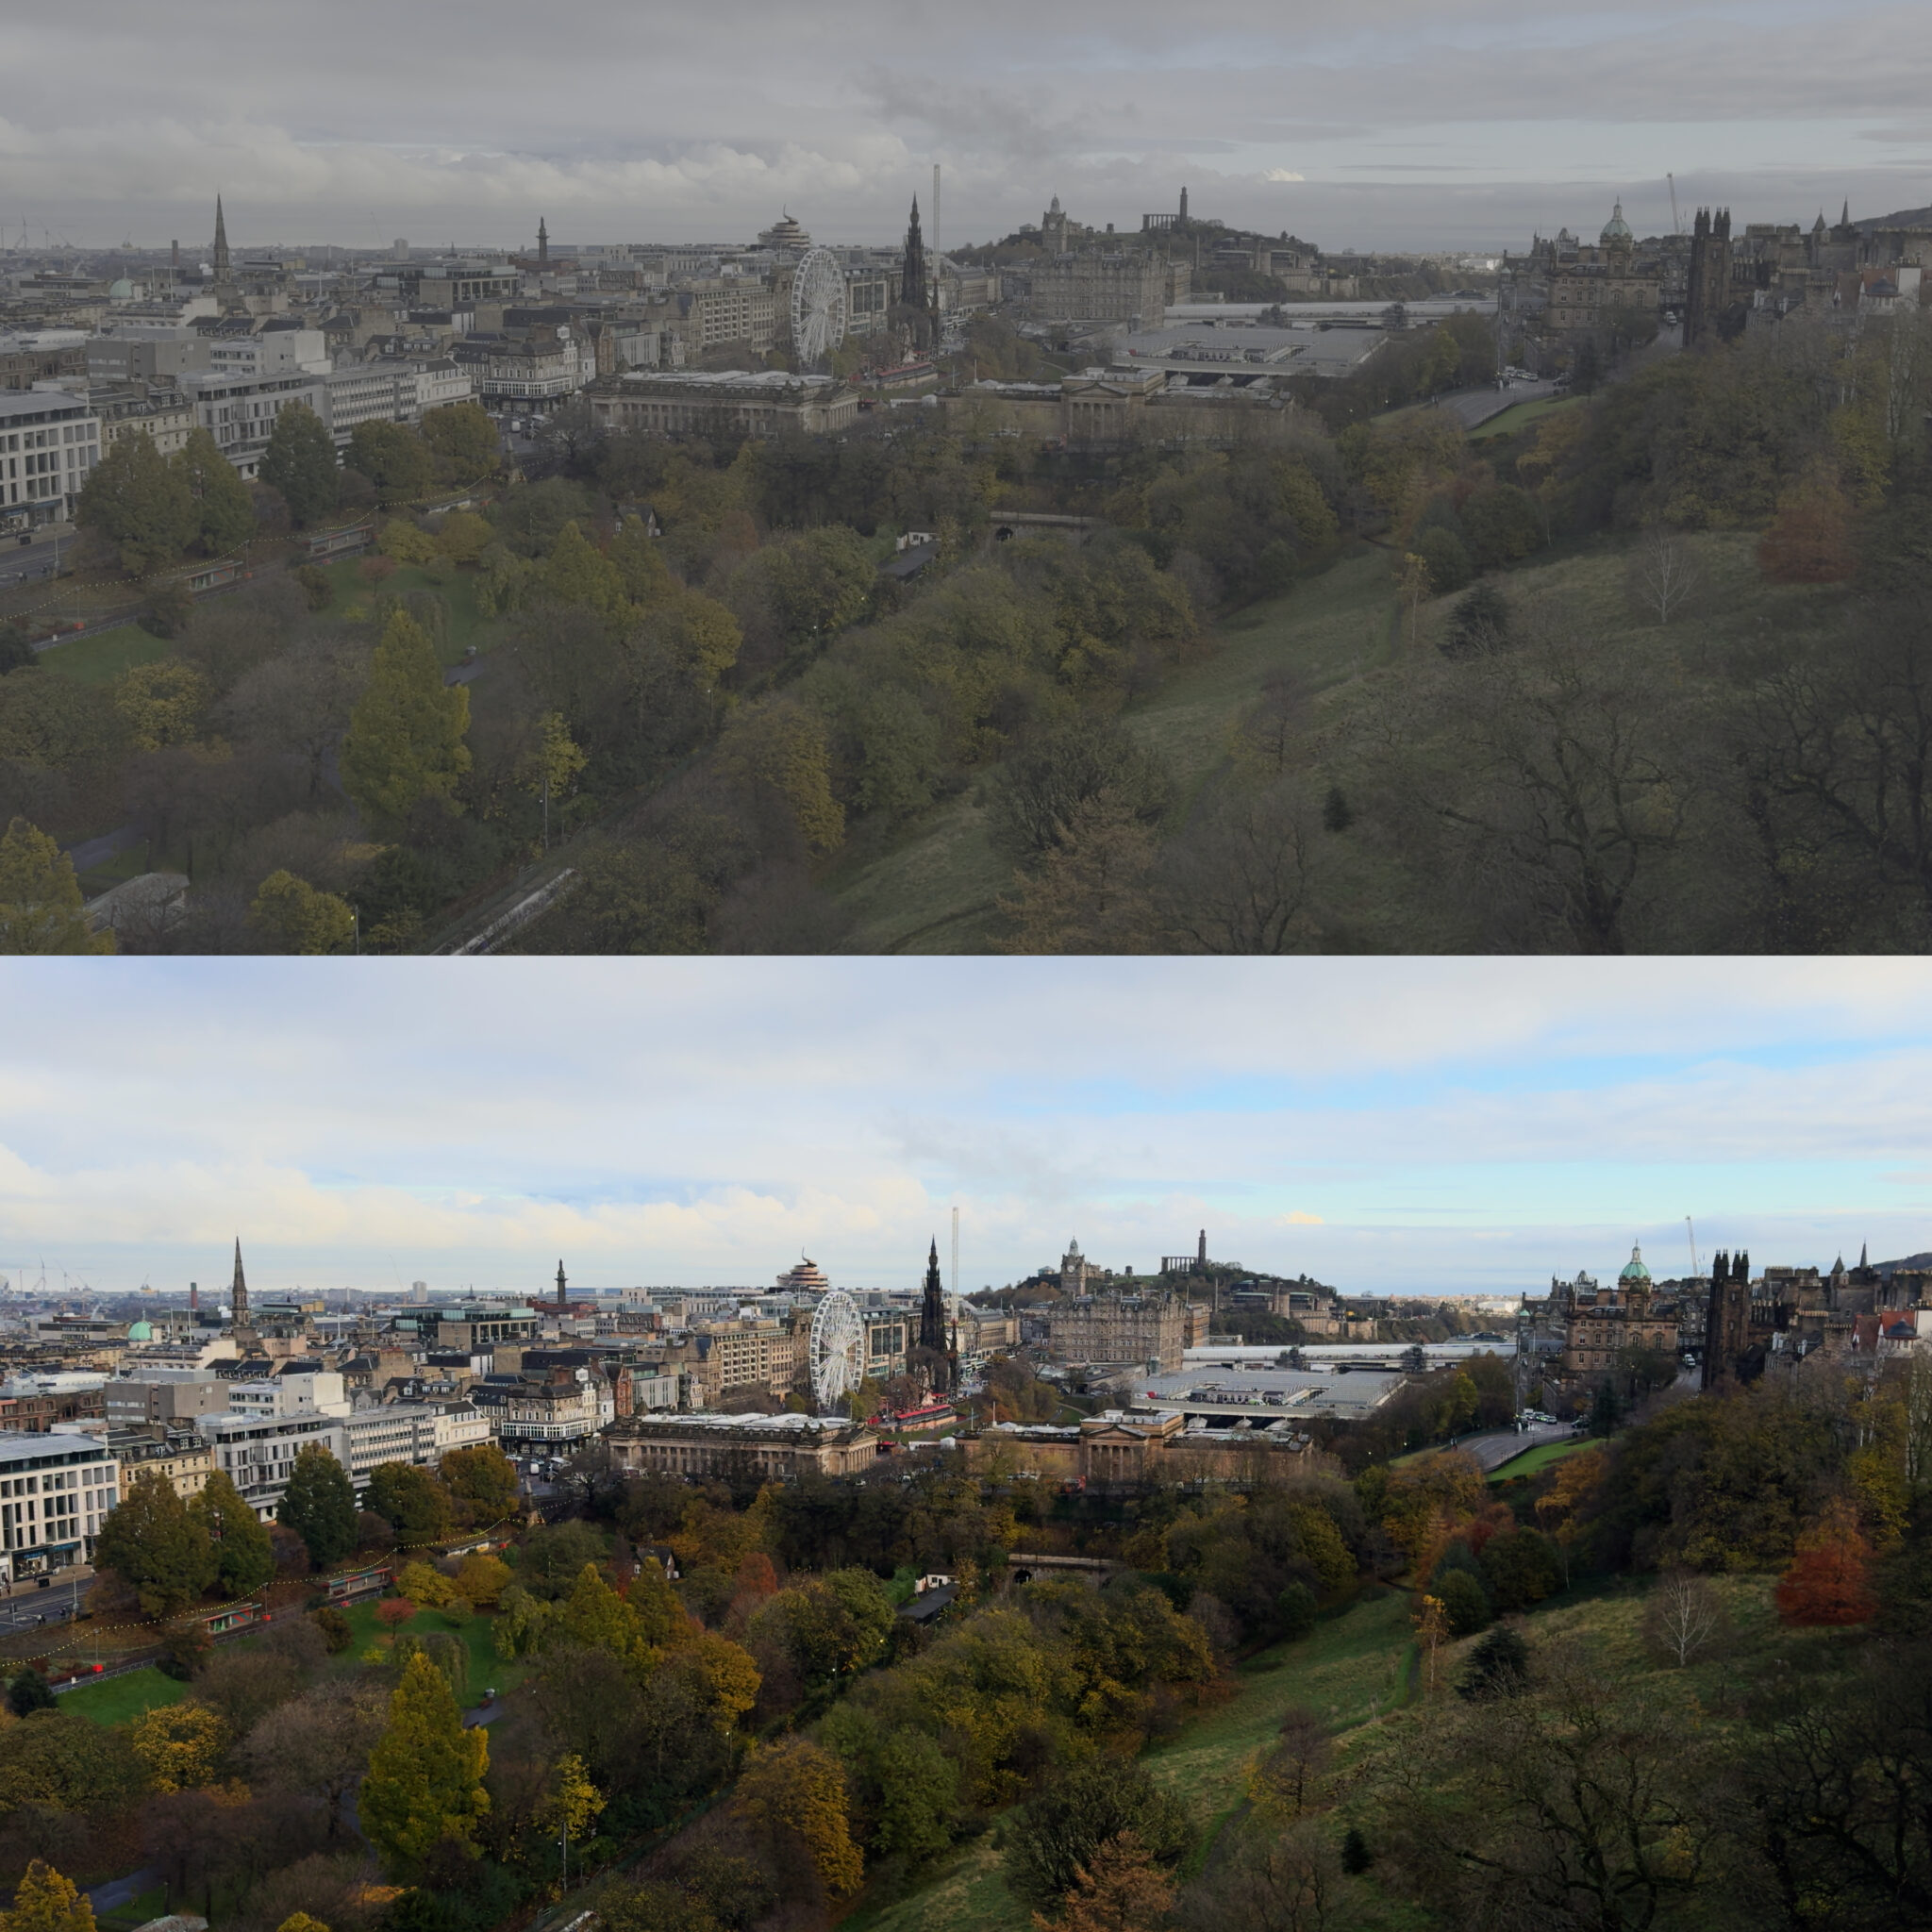
Take a look at the two images to the left. Both images are still frames from footage of a palm tree, filmed by vlogger Zy Cheng. The top image is in standard iPhone mode and the bottom was originally captured in Apple ProRes Log. The conventional image, with tone mapping, demonstrates the automation of preserving details. The tree and sky’s details are both preserved. On the Log version, restored to Rec 709, a color-gamut-standard for general viewing on common monitors, it presents a more “true-to-life representation,” as described by Cheng. The integrity of the scene’s actual contrast is preserved.
Color and sharpness
Another appeal to Log is having footage that is unrecognizable as iPhone footage. The automation of contrast and saturation is not the only giveaway of mobile phone footage. There’s also a recognizable digital sharpness in photos and videos shot on a smartphone. In Apple Log, the softer and less destructive look on details gives videos a more film-like quality. Of course, you also have the freedom to sharpen the footage in post-production.
Going back to dynamic range, Log footage provides more information to work with when color grading. Its ability to preserve information in the highlights and shadows also allows for more flexibility in editing colors in post-production. The logarithmic encoding format has a wider dynamic range of both light and color information.
Best practices with Apple ProRes Log
Intrigued, yet? Now that we have the benefits in mind, let’s get into some simple tips on shooting Log.
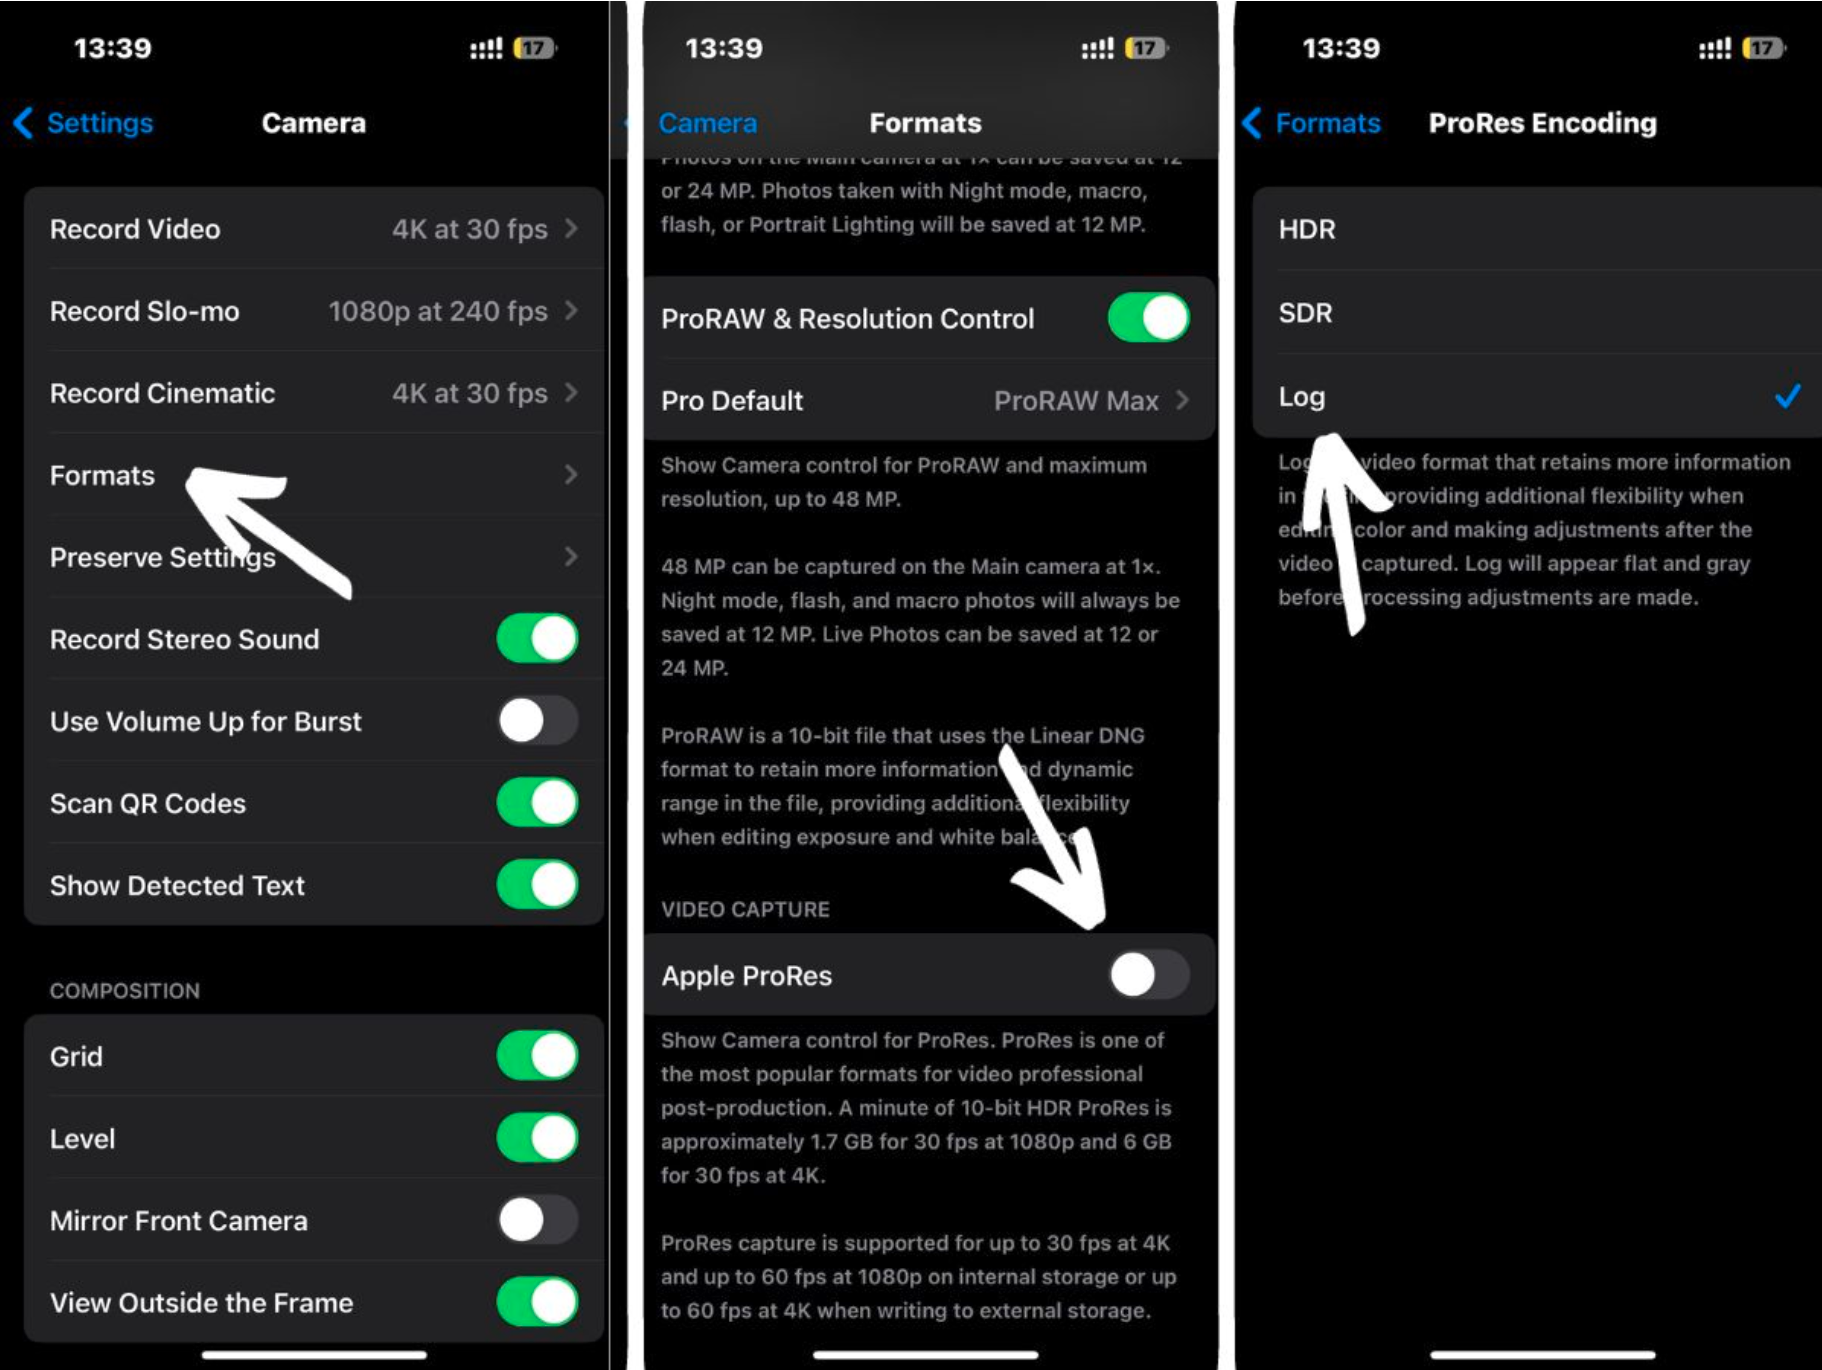
To enable and record a video with ProRes Log, follow this link. There are options to choose between HDR, SDR and Log within the ProRes family, but of course, for our purposes, choose Log.
Without getting too detailed, typically when shooting Log on DSLR or cinema cameras, exposure has to be just right. Usually, it’s a few stops over in most cases to avoid muddy shadows and detailed highlights.
Conversely, on the iPhone, users have reported that when shooting straight out of the built-in camera app, iPhones tend to over-expose the image. So, (counter-intuitively to filmmakers) adjust the exposure to -1 EV, or underexposing the phone by one stop.
To do this, tap on your subject, then press and hold on the subject on your iPhone screen. This looks like exposure and focus on your subject for consistency. Finally, to underexpose by one stop, tap on the arrow at the top of your phone to change the menu or options at the bottom. Tap the plus and minus icon. Dial down to -1.0. These steps are also outlined in an easy-to-follow video by vlogger Matt Johnson. 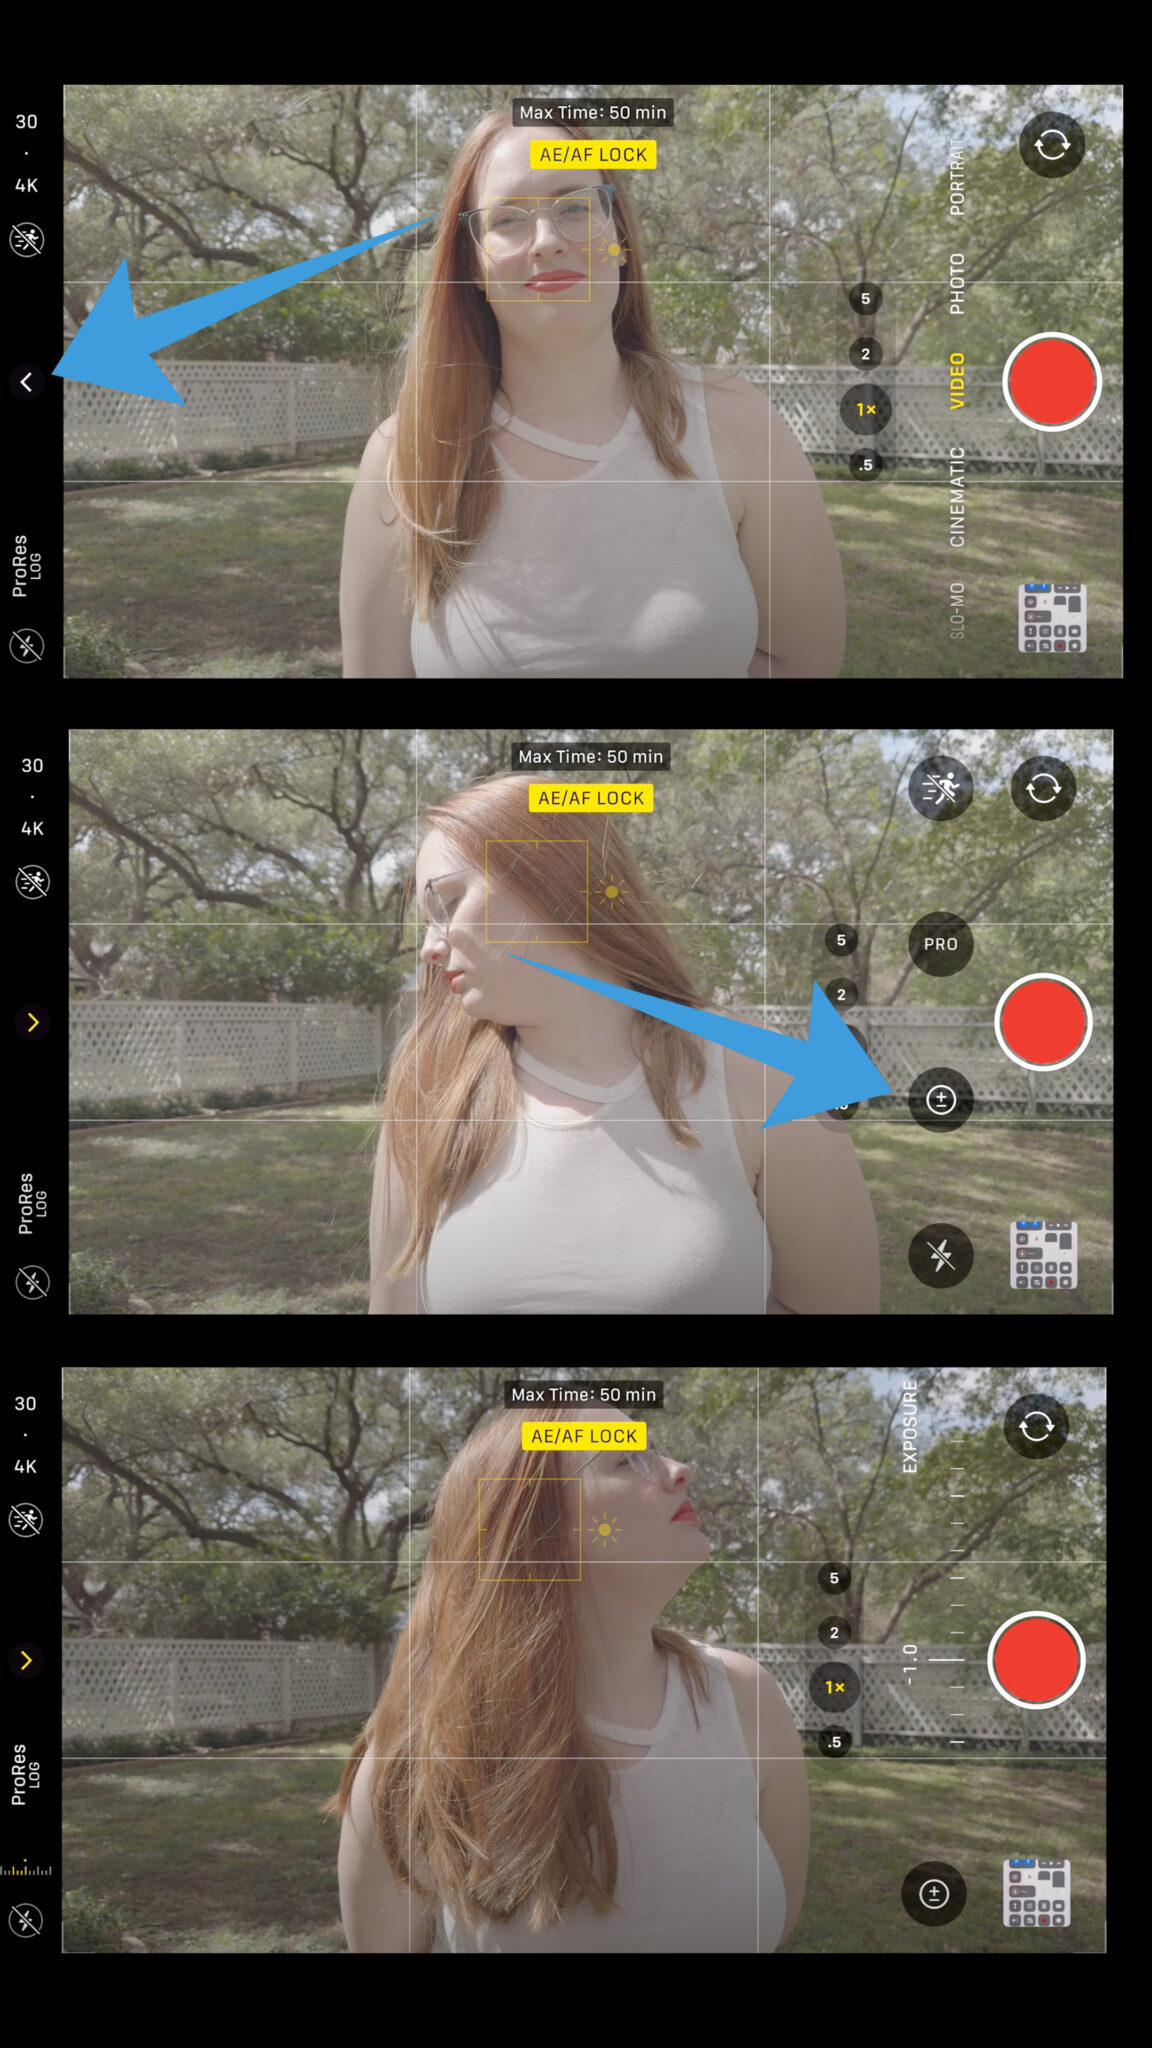
Lastly, when shooting Log when it’s bright outside, avoid blowing out your highlights. In low light, properly expose your subject with mindfulness on the shadows or darkest parts of the scene. Ultimately, you want to bump up your shadows minimally in post. Otherwise, you will get a lot of noise.
Last things to keep in mind
With using Apple ProRes Log, experts highly suggest downloading the Blackmagic Camera App or Moment Pro Camera App. This is due to two significant factors: shooting in Apple ProRes Log produces massive files and having additional exposure tools in these apps will help you get the most out of your video capture.
In the meantime, you can plug in an external drive, like an SSD drive or a memory card, into the USB-C connector. However, it’s a bit cumbersome to have a dangling card or external drive. So, I recommend using an additional app, which will allow you to use a more manageable file format while still using Log.
Admittedly, walking through those features in those apps and how they can assist with Log is a beast in and of itself. I’ll tackle that on my next blog *insert forming circles with claps here.* I will also dig into how to color grade Log footage in our next blog.
For now, if you have an iPhone with these capabilities, experiment! If you can’t wait for the next blog, here’s a great video outlining how to use the Blackmagic Camera App alongside Log. The video also offers some LUTs (Lookup Tables) that are more or less color filters you can slap onto your footage to color grade your desaturated Log footage.
Until next time, happy professional apple and mutilated tree time!